" content="(null)">
Professional Security System Installation Made Easy
The Vista 20P control panel has twenty-five connections. It sounds like a lot, but it's really just a series of simple connections.
The transformer converts your 110 volt outlet voltage to a more useable (and safer) 16.5 volts  to power the Vista 20P. 18 gauge speaker wire is perfect for running power from the transformer to your control panel. It's an AC power source, so polarity isn't a concern when wiring the transformer to terminals one and two of the Vista 20P.
Terminal 3 is the siren output. When an alarm occurs this 12 volt output goes high to sound any connected sirens.

Terminal 3  = Positive Siren (+)

Terminal 4 = Negative Siren (-)
Terminal 5 is the auxilliary power output used to power devices connected to the Vista 20P. Devices that get their power here include keypads, motion detectors, glass breakage detectors, etc.

Terminal 4 = Negative for aux devices and sirens (-)
Terminal 5 = Continuous 12 volt output (+)
Terminals 6 and 7 are the ECP circuit. The ECP circuit is the communication path for data driven devices like keypads, internet communicators, relay modules, and wireless receivers.

Terminal 6 (Green) = data in
Terminal 7 (Yellow) = data out
The keypad is conveniently marked with wire color designations to match the Vista 20P ECP terminals. Black, red, green, and yellow are the typical colors used in four conductor security wire.
The 6160RF keypad  included in the V20P60RFPK kit has a built-in wireless receiver that allows the use of wireless devices in your system. If you didn't already have a 6160RF you could add a standalone receiver like the 5881 ENH.
There are eight hardwire zone connections on the Vista 20P. Zone one is special in that it can, if needed, power two-wire smoke detectors. Zones two through eight are special in that they can be zone doubled to provide two zones per zone connection. The typical do-it-yourself system has no more than eight hardwire zones and no smoke detector circuit, so this tutorial will proceed with the understanding that your system will fall into the typical range of a diy system (eight zones or less, no smoke detector circuit). Keep in mind that you still have dozens of wireless zones available separate from hardwire on-board zones.
This is how to connect a powered device to a hardwire zone. The 2000 ohm resistor (provided) is installed at the device to allow the control panel to supervise the wire along its run. To be honest, most installers simply install the resistor at the control panel zone to make future system upgrades easier (finding resistors on door and window zones can be a pain). Put simpy, as long as the resistor is somewhere (anywhere) in the circuit the control panel will consider the zone valid.

TIP: The best, easiest, and cheapest way to connect a resistor to a wire is to solder it using a cigarette lighter. Solder is cheap, and the lighter will heat the area to a suitable temp in just a few seconds.
The .gif above is a summation of how to connect door and window contacts to a hardwire zone. Any number of contacts can be grouped on a single zone. A typical contact zone description would be "Living Room Windows" or "Rear Basement Windows". Try to keep door zones singular. "Front Door" as a zone is much more useful during an alarm condition than "Main Floor Windows and Doors".
The telephone connection is used for reporting alarm signals to an alarm company central station receiver. Telephone communication of alarm signals is becoming obselete with modern digital phone systems rejecting the 1980's modem technology used in alarm panels. That being said, below is a diagram explaining the telephone connections of a Vista 20P.
Terminal 25 - Earth Ground

Terminal 25 is the earth ground connection. This connection is optional, and most often not made. If you have a handy grounding location (copper water pipe, ground rod, etc.) feel free, it'll offer a degree of surge protection to the panel.
Honeywell Installation FAQ


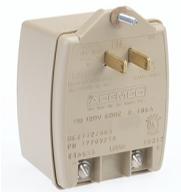
I need a new transformer for my Honeywell Vista alarm panel, what kind do I need to purchase?

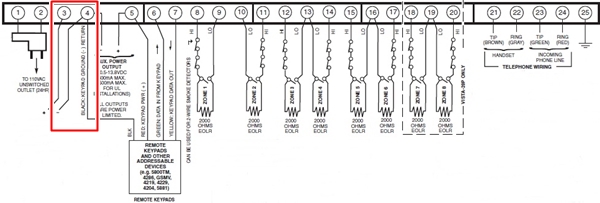
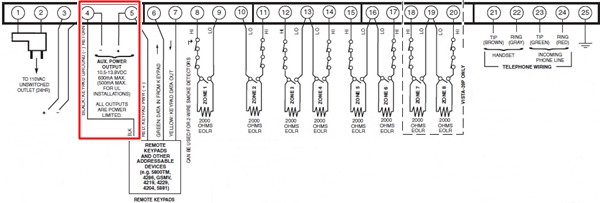
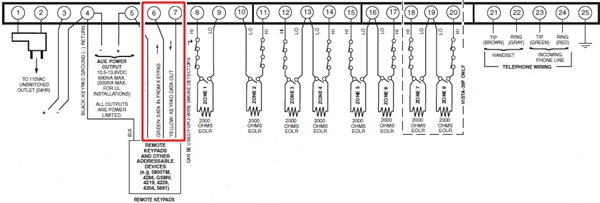
Honeywell panels use a 16.5 volt transformer, typically either a 25vA or 40vA model. Transformers aren't proprietary, so any brand will work. The only real requirement is its voltage rating (16.5 volts) at a minimum of 25vA current output.


My motion detector is false alarming, how do I fix it?

Most alarm systems have standard PIR type motion detectors that function by detecting a person's body heat as it moves along the cooler background of walls, floors, and furniture. The problem is that a PIR can be fooled by any number of environmental issues.

Check for:
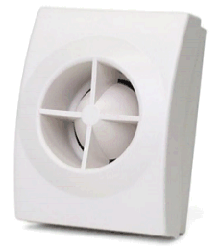
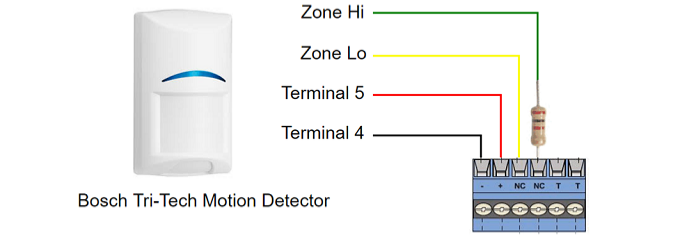
Any motion detector will eventually go bad and need to be replaced. A wired motion detector isn't proprietary, so if you need a replacement you might as well Upgrade to a Bosch Tri-Tech


One of my doors no longer acivates the alarm system, how do I fix it?

The internals of a door or window contact are very fragile and can be damaged by something as simple as the static charge from lightning striking nearby. The bad contact will either remain closed when it should trip, or remained tripped when it should be closed. Sometimes it'll even fall somewhere in the middle by adding adding resistance on closure, or never fully opening when tripped. Long story short, if you have a bad contact you can replace it easy enough. Most residential contacts are 3/8" recessed press fit contacts.

  1. Pry out the contact using a small flat head screwdriver
  2. Cut its two wires near the contact
  3. Strip back about 1/4" of insulation on each wire
  4. Use a Terminal Type 3/8" Contact as a replacement (either wire to either terminal)
  5. Press the new contact back into the original hole
You'll sometimes need to use spackle or wood filler to smooth out the area around the contact.


We're a participant in the Amazon Services LLC Associates Program, an affiliate advertising program designed to provide a means for sites to earn advertising fees by advertising and linking to Amazon.com.


MyAlarmGuy.net